SRT RSS Feed

Looking Back – A Photo Contest For the New Year

While looking back is not my favorite perspective on life (I wallow rather than reflect), it’s a new year and straddling the fence of what lies ahead in the new year and what’s strewn behind from the year past is an acceptable occupation for the next day or two.  And since my imagination tank is running on fumes, we’re having a side mirror photo contest!  I love mirror shots.  They’re intriguing, often offering a view that eludes straight-on viewing. They can be deliciously deceptive or wackily interesting.  On every road trip I shoot something using one of these reflectors of what’s behind me, but there’s either water spots all over the mirror, a dust cloud making itself at home in the cab or wires crisscrossing the idyllic scene. The one below is a rare exception and is here only because I can’t make a post without a photo.

Post your SIDE MIRROR photos to the Solo Road Trip page on Facebook: here. [You’ll have to “like” the page before you can post.]

Winners choice of a $50 gift card to Amazon or B&H Photo, neither of which are advertisers. SRT is an Ad Free site.  We’re willing to change that stance for a Dodge SRT or for much less, whichever comes first.

The contest runs until midnight January 15th.

Join the Road Trip Revolution at the Solo Road Trip Facebook Fan Page, here.

Travel Photography with a Disposable Camera

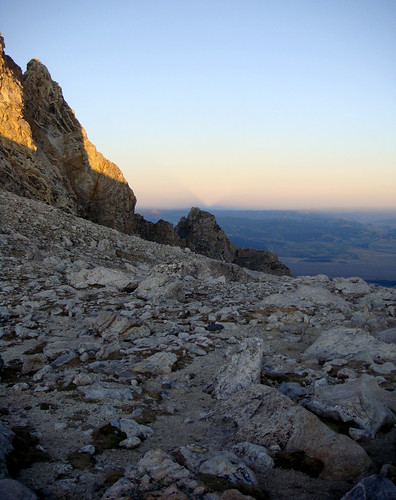
Your camera equipment was stolen in Portugal. A clumsy bauble above the Seine left the river owning the digital SLR. You own no camera equipment, but there’s something you really want to photograph on your upcoming trip. Lots of scenarios could result in a disposable/single use film camera landing in your hands. The good news is great photos (even artistic photos) can be achieved with the simple equipment.

view from the upper saddle

Wyatt

My personal experience has shown there to be an advantage to carrying a disposable camera (my secret weapon is out!) – everyone thinks you’re a tourist with no serious photographic intent. This translates to an ability to capture moments that wielding more serious camera equipment can make difficult. A whole new world opens up to the holder of a disposable camera.

Disposable film cameras come in several ISO choices – 100 to 800, but at most convenience type stores (and even vending machines in Japan), you’ll be hard pressed to find anything other than 400 and 800, with 800 being prevalent. A flash is optional (and recommended). Various manufacturers make them today in a few “versions” – wedding, sport (waterproof up to 50 ft.), panoramic, and one with a zoom function, albeit a weak zoom function. Chances are if you’re purchasing one on the road, your choices will be limited to the most basic.

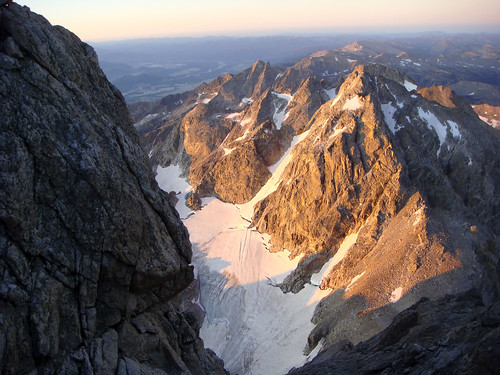
Despite the simplicity a point and shoot, fixed focus camera connotes, to get photographs you’ll be proud of, MORE work and creative thought is required – not less. Understand the camera’s limitations. They typically focus anywhere from 4-5 feet to infinity, and for the flash to be of use, you’ll need to be within 10-12 feet of the subject. Work within these restrictions though and magic can happen. And remember, the camera has nothing to do with how you see the world. Look for new perspectives and the single use camera will become your photographic friend.

Before we get into the tips, here’s something else to consider where disposables are concerned: kids LOVE them. Put one into the hands a child and prepare to be amazed!

While ALL the basic photography rules apply, there are a few things in addition to the basics that will give your photos from a disposable camera some WOW power.

Disposable Camera Pointers:

* Search for reflection. Reflection can be created from water, mirror or glass, the cone of an airplane, a pair of reflective sunglasses, or a rear view/side mirror. Use it for an artistic slant on common scenes.
* Panning the disposable camera can yield photographs with a bit of movement to them. It takes practice to know how quickly to bring the camera from side to side while you click the shutter, but it’s worth experimenting.
* Try using the headlights of a vehicle, or a flashlight to light your subject matter.
* Tilt the camera to capture scenes with a twist to the perspective.
* Take a picture of part/half of something. It’s a technique I’ve experimented with on occasion, and while it works best with close subject matters, it can yield a very interesting photograph.
* Assuming you sprung for the flash, use it! Backlit photographs, especially of people, benefit greatly from using the flash. Overall, don’t be afraid of using the flash. Unexpected effects will often be the result.
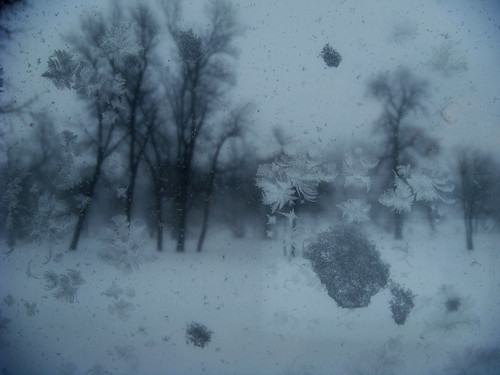
* Don’t be afraid of haze, fog, steam, or any condition that to the bare eye seems out of focus. Tack sharp is overrated.

view from the top #3

Basic Photography Tips: (several of these tips are from Doug Henderson, 7 Tips from a Photography Pro)

* LIGHT….is the only thing you are photographing, so make it your prime consideration. Where is the light? How is it falling on your subject? What color is it? How hard is the light?
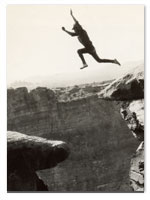
* Everyone sees the world at eye level. For your photos to stand out, find ways to shoot at anything but eye level. Stand on something, or get lower, even to the point of lying on the ground.
* Get off the beaten path, like the star ship Enterprise; BOLDLY GO WHERE NO MAN HAS GONE BEFORE.
* Don’t be afraid. Don’t be timid. Never fear to ask anyone to do anything that will make a better picture; the worst they can do is say no, or maybe HELL NO.
* Tune in to the time and place. In the same sense that you can never swim in the same river twice, you can never shoot the same photo twice; the river of light is at a continuous ebb and flow. Let that moment speak to you, and then use your camera to take that message to the rest of the world.
* Shoot from your heart.
* If it’s not interesting, you’re not close enough.
* Don’t put the object of interest in the middle, a rule commonly called the Rule of Thirds. Offset the focal point.
* Look for symmetry of objects or a repeating theme.
* Walk all the way around something (if you can) to check out the various perspectives. You’ll be surprised at how the “backside” of things appears.

If you’re still convinced travel photography can’t be pursued with a disposable camera, shoot with one for 2-3 weeks at home. Sometimes it’s the simple exercise of carrying the camera around and tripping the shutter that overcomes our hang-ups.

P.S. It’s photography – have FUN!

Photo Purist Gone Astray: One Road Trip Sign, 10 Ways To Screw With It

Having been called a purist snob in regards to both photography and flyfishing (and not caring a hoot about that label), this post is a bit challenging to write.  I’ve also been told I must like crow because I eat a lot of it. I’d say the latter is very accurate. I do eat a lot of crow.

As much as I’d like to claim I never manipulate my travel photos, that would be a bald-faced lie. I do. Furthermore even when I shot only Black & White film and developed it in the darkroom, I altered the process; different chemicals, rinses, times, tools used to burn and dodge. Man! those were the days.

This penchant has grown with every new Photoshop tool I discover.  I’ll likely never be one for a great deal of manipulation, mainly because let’s face it, I’m unlikely to ever acquire the skills.  Last winter after a 40 hour Photoshop course with Doug Henderson (7 Tips From a Photography Pro), I became LESS of a Photoshop hack. It’s sort of the same as giving a compliment by saying something “doesn’t suck.”

I discovered Nik Software’s Silver Efex sometime ago. It’s become my digital darkroom work-horse. And I’ve yet to find anything about it to criticize (highly unusual).  I wanted to test another of their products, Color Efex Pro, so I downloaded the 15 day free trial and put it through the paces.

I’ve loved this sign since photographing it on a road trip to Kansas. I’ve not done anything with it – until downloading Color Efex Pro. See Jane run.

Leo the Cowboy

SOOC – straight out of the camera. For the most part.

Leo the Cowboy sunshine copy

Sunshine filter

Leo the Cowboy film effects Kodachrome64 copy

Kodachrome 64 filter

Leo the Cowboy old photo #2 copy

Old Photo filter

Leo the Cowboy old photo

Old Photo filter

Leo the Cowboy polaroid transfer copy

Polaroid Transfer filter

Leo the Cowboy Detail Styler copy

Detail Styler filter

Leo the Cowboy Solarization copy

Solarization filter

Leo the Cowboy Tonal Contrast w High Pass copy

Tonal Contrast with High Pass filter

I used the Tonal Contrast with High Pass filter on the Serva-teria photo on the post: 13 Reasons for a Road Trip.

Leo the Cowboy Polarized copy

Polarize filter

The software is offered in 3 versions – standard, select, and complete and ranges in price from $99 to $299. After testing it, my advice is to buy the complete version for $299 – it’s the best value and will lend a degree of creative latitude and flexibility you can’t get elsewhere.

And I hope none of these are mislabeled. My trial version ran out before I had time to double check the filter names. Regardless, you get the picture.


L’heure Bleue “The Blue Hour”

The term has a lot of associations. From Guerlain’s L’heure Bleue perfume created in 1912, to human disposition, as in “beating the wintertime blues”, to a time of innocence, such as that used to describe Paris just prior to World War I, a definition of the blue hour is difficult to nail down.

That is, until you see it.  Even then it will defy words. Or more accurately, especially then, it will defy words.

On a road trip to North Dakota this year I captured the photo below at dusk.  Looking through the windowpane at the frost and bits of snow clinging to the glass, I was taken aback with this dream scene.

L'heure Bleue

A North Dakota L’heure Bleue

I’d heard the term used for the golden hour of photography, was familiar with Roy Orbison’s “When the Blue Hour Comes”, knew that in Scotland it’s referred to as “gloaming”, had heard the German term ‘alpenglow’ used to describe a similar effect (specifically that which occurs on mountains), and had even read (and amazingly recalled) a Victorian era term ‘Belt of Venus’ that was used to describe the blue or golden hour.

But I’d never captured it so eloquently.

When my camera stopped clicking and my host broke the silence, she said “it’s the blue hour. Isn’t it something?”  I thought I’d cry.

So impressed I was, some research was in order. The effect appears to be exacerbated in colder climates. But it’s not the temperature, rather the snow on the ground absorbing the red light frequencies, that give a more vividly blue appearance than in climes without snow.  Light scattering (Rayleigh Scattering) is also at work but this is not a scientific post so that’s all I have to say about that.

Films and digital cameras have differing dynamic ranges (it’s very difficult for anything electronic to achieve the same dynamic range as the human eye). This frequently translates to a more saturated blue capture than what appears to our bare eye. Here’s a photo with my point and shoot Sony just before landing in Jackson Hole, Wyoming.  It’s ummm, very berry blue.

The Blue Hour - landing in Jackson Hole, Wyoming

Jackson Hole Blue Hour

The stab of the direct summer sun means 3+ months of discomfort for me. Having been born and raised in this area, you’d think my body would be used to it. It’s not. As a child I read Heidi every summer to mentally escape the heat of North Texas/Southern Oklahoma. Every winter I prayed for snow.  Seldom were my prayers answered. Until that is, I took a career promotion and moved to Jackson Hole, Wyoming to launch and run the Bank of Jackson Hole’s Trust Department.  With all the glorious snow and the diamond dust sparkle of temperature inversions, all my childhood prayers were answered the first winter!

This summer was a mild one and yet I can’t wait to watch the fire crackle in the fireplace.  To look out the window and see a vivid winter sunset catapult through the pristine air heralding an Oklahoma blue hour makes me giddy.  And it’s just around the corner.

Here are a few more of my favorite L’heure Bleue photographs.

Medora, North Dakota

Theodore Roosevelt National Park, North Dakota

Plains Indian Burial Platform

The Badlands, South Dakota

Theodore Roosevelt National Park

North Dakota

Mountain Alpenglow

Grand Teton Base Camp – mountain alpenglow


Your Black & White Opinion

On a recent road trip, this old dairy barn was photographed.  The sky was beautiful, the leaves made such a lovely carpet, the light was just right. Notice how it falls on the gate leaning against the fence.

Both were shot with a Canon 5D (in color) using a 16-35 mm lens. The Black & White rendition was converted using a Photoshop plug-in I discovered recently called Silver Efex Pro by Nik Software. It’s an amazing program and has helped wean me from the addiction to the darkroom. Which means I’m shooting less film, storage headaches are decreasing along with trips to the lab to have negatives scanned.

Now that we’ve discussed all that, which do you prefer of the two?

Barnsdall, Oklahoma barn

Barnsdall, Oklahoma barn

By the way, Nik Software allows a download of a 15 day trial for all their products. And there’s no watermark on your work so you can actually SEE what the product does.  And no, Nik Software doesn’t advertise on my site.  No one does!  I love the freedom that comes with that. Maybe not as much as I’d love some income?


The Grand Climb


Tammie DooleyAbout SRT... I’m a traveler, writer and photographer for whom the open road frequently summons. Adventurous solo road trips are a staple for me, and a curiosity. So I created this website to share them and inspire you to step out and give them a try. Welcome!

A soul that sees beauty may sometimes walk alone – Wolfgang Von Goethe

  • Categories


  •  

    Connect with SRT

    RSS Connect on Twitter Subscribe by Email
    Email me
    Become a SRT Facebook Fan
    Follow me on Twitter
    See my photos on Flickr

    I want to hear from you!
    ~ Tammie


    World Reviewer adventure travel blogs